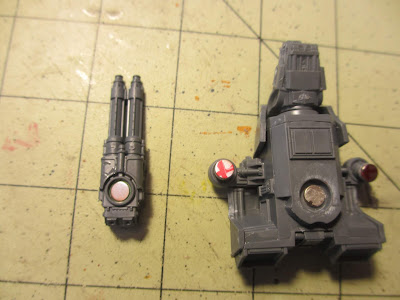
The last time I did magnets, I had a bit of a challenging time with them. I knew there had to be a good way to deal with them so I went to YouTube!
And found madmen who had mostly hope-based systems of dealing with the tiny deamons. "Magnets are tricky to use, so I have to redo a bunch of stuff!" was my favorite quote from the research. Sigh. I'm sure there are a ton of helpful videos on the subject, but I have a finite amount of time.
I experimented for an evening, and this is what I have come up with. A very simple, repeatable system that will work 100% of the time. You just have to pay attention and don't rush it.
The main problem I had with magnets is that they flip over, for like no reason. Usually when you aren't looking. Marking them works, but only if you always mark the correct side. I know most of you out there already know this, and have figured it out. This article is just in case I can help somebody out there.
The key to successful magnetizing is magnet management. And to do that, you need a Master Magnet. Take a piece of cardboard (4"x3" or whatever) and using CA glue ( I like Gorilla) attach a magnet in the center of it. As this is the Master Magnet it doesn't matter what side is out.
Color the magnet with a red sharpie (or whatever you like, but I will refer to it as the Red side) and let the glue dry well.
Get all the parts that want to have magnets ready and handy.
Drop a new new magnet down on top of the Master Magnet. Color the side facing out.
The magnet now has a Red side and a Bare side.
A Red side will only nest to a Bare side.
We will have two classes of objects we want magnets on: Main and Attachment. Things like the Titan bodies are Main, and all the Weapons are Attachments.
Main Objects have the Red Side of the magnet facing out.
Attachments have the Bare Side facing out (Red Side against the plastic).
Glue the colored magnet in place on model.
Drop new magnet on Master Magnet and color it red.
Repeat.
It is methodical, but it makes keeping track of what side is what quick and easy. It doesn't matter if the magnets get, flipped, dropped, or attach to another magnet. You know it is marked correctly across the entire project. I have done eight Titans and did not have to go back and re-do anything.
Go And Build Something
With Logic and Magnets


